Data on web pages don't always pre-exist on the HTML. Instead, they often require steps before they are rendered using browser actions. One of such action is forms, which render data behind clicks or entering credentials.
In this article, we'll explain how to scrape forms using both HTTP clients and headless browsers. Let's get started!
Key Takeaways
Master form scraping using HTTP clients and headless browsers for authentication, search forms, and dynamic content submission across different complexity levels.
- Use HTTP clients like httpx to simulate form POST requests with proper headers and authentication tokens
- Extract CSRF tokens and session cookies from login pages before submitting form data for authentication
- Use headless browsers like Playwright, Selenium, and Puppeteer for complex forms requiring JavaScript interactions
- Implement proper form field detection and filling strategies using CSS selectors and element waiting
- Handle dynamic form elements and validation requirements using browser automation tools and JavaScript execution
- Choose between HTTP client and browser automation approaches based on form complexity and anti-bot measures
Scrape Forms With HTTP Clients
Let's start our guide by scraping forms with HTTP clients. For this, we'll use two Python community packages:
- httpx to send the HTTP requests and retrieve responses.
- parsel to parse the HTML for data extraction using XPath or CSS selectors.
- asyncio to execute our script asynchronously for an increased web scraping seed.
Since asyncio is pre-installed in Python, we only need to install the other two packages using the following pip command:
pip install httpx parsel
Note that httpx can be replaced with any other HTTP client, such as requests. As for parsel, another alternative is BeautifulSoup.
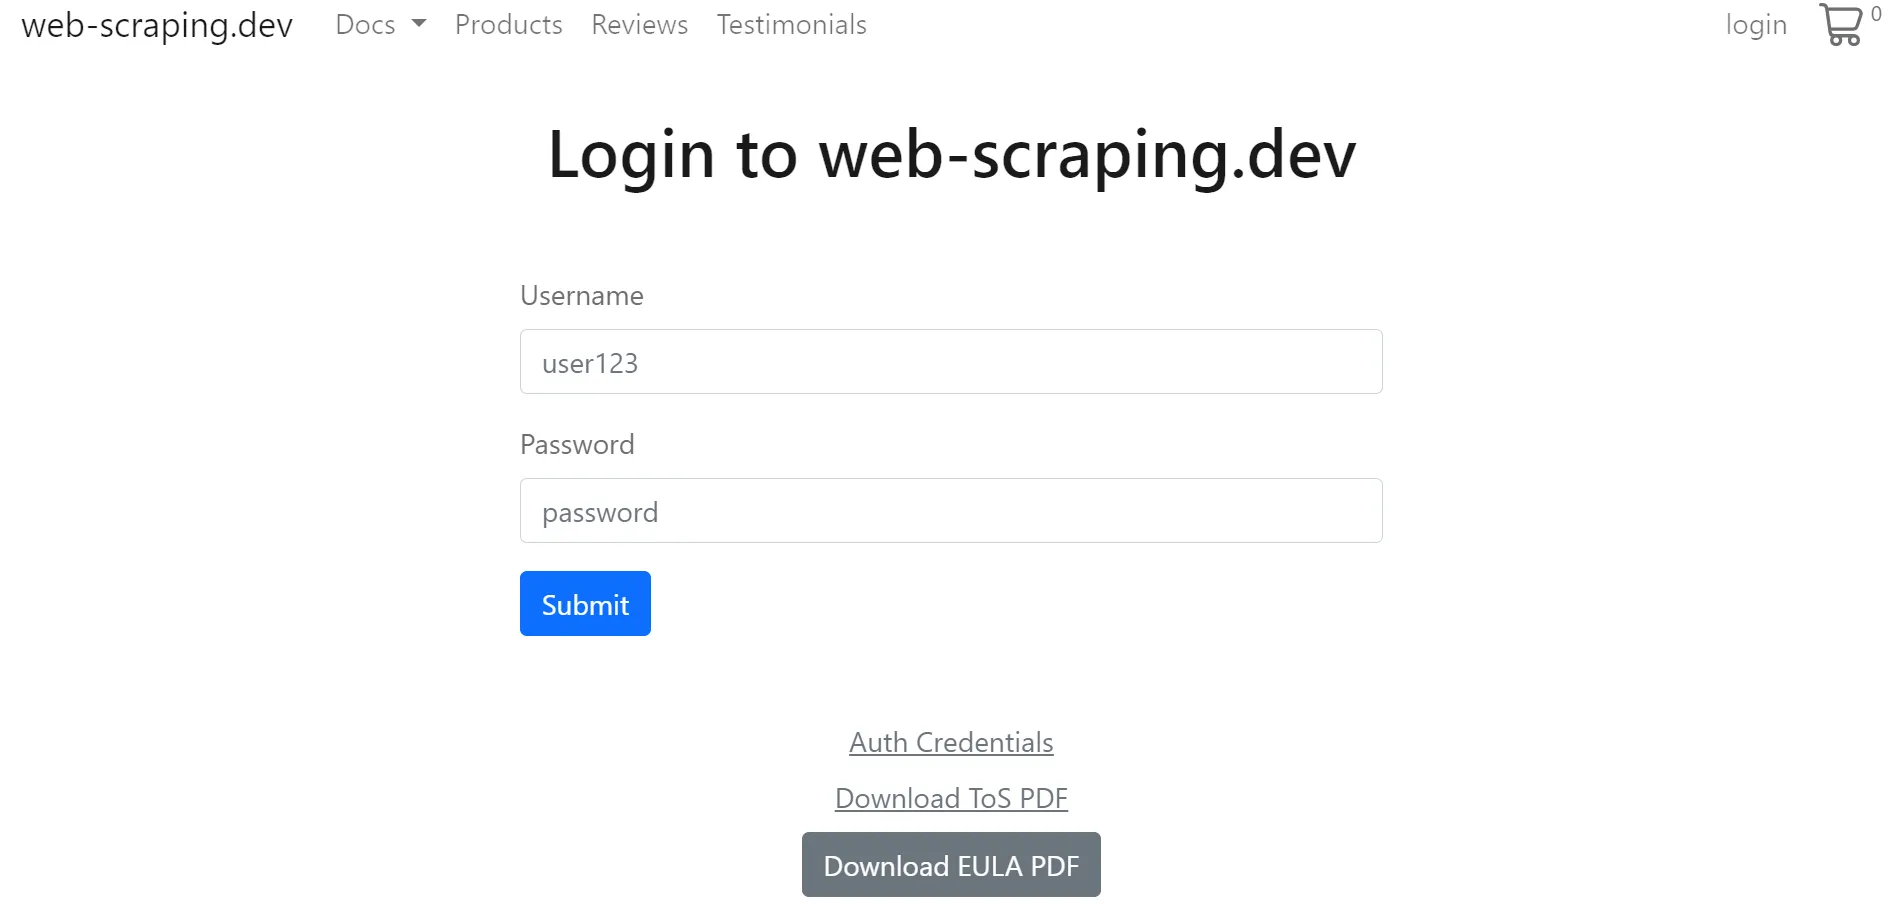
In this guide, we'll use the login page on web-scraping.dev as our tutorial's target web page:

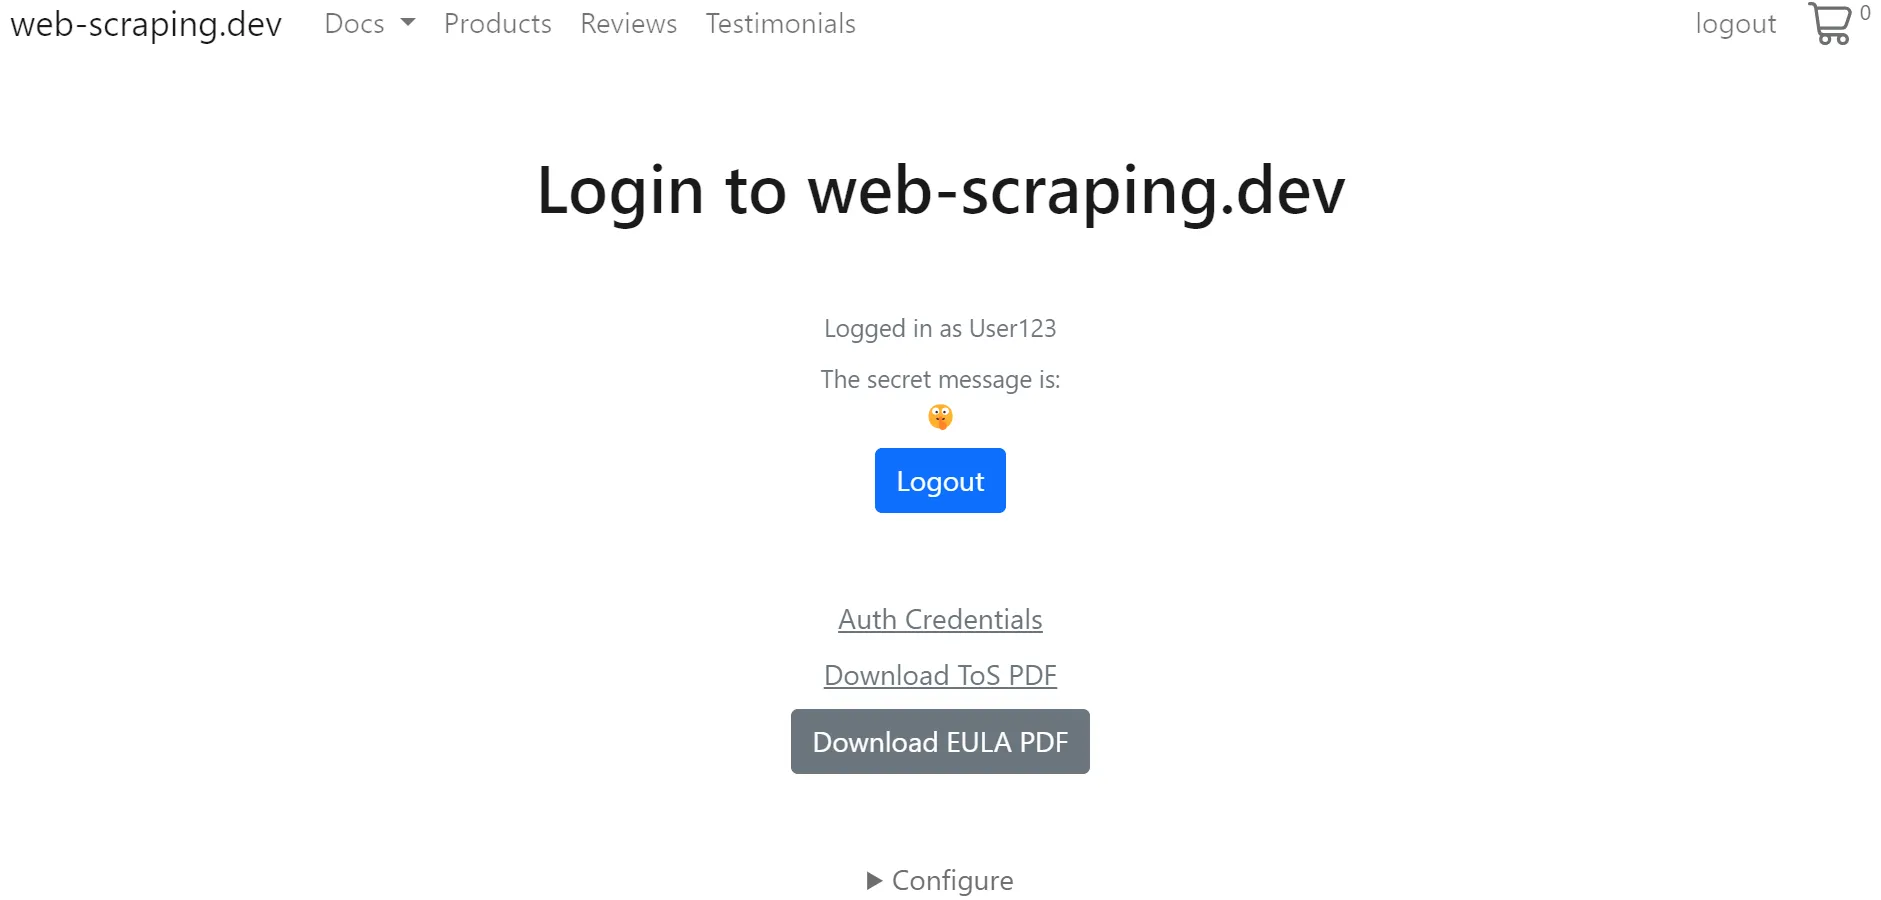
The data we are interested in are accessible by scraping login form:

To scrape data from the above login form example using HTTP requests, we can follow either of two methods:
- Provide the request with the necessary headers and cookies.
- Simulate the form POST request responsible for auth values.
Both of the above form scraping methods are similar, except for the way they handle the required request configuration. The first approach is ideal for requests that have static request configuration. However, in most cases, these values expire over time, making the second approach more suitable.
We have previously covered the first method through cookies. In this one, we'll replicate the form POST request.
To start, let's observe the background requests responsible for retrieving the target page data:
- Open the browser developer tools by pressing the
F12key. - Add the login form credential credentials and click the login button.
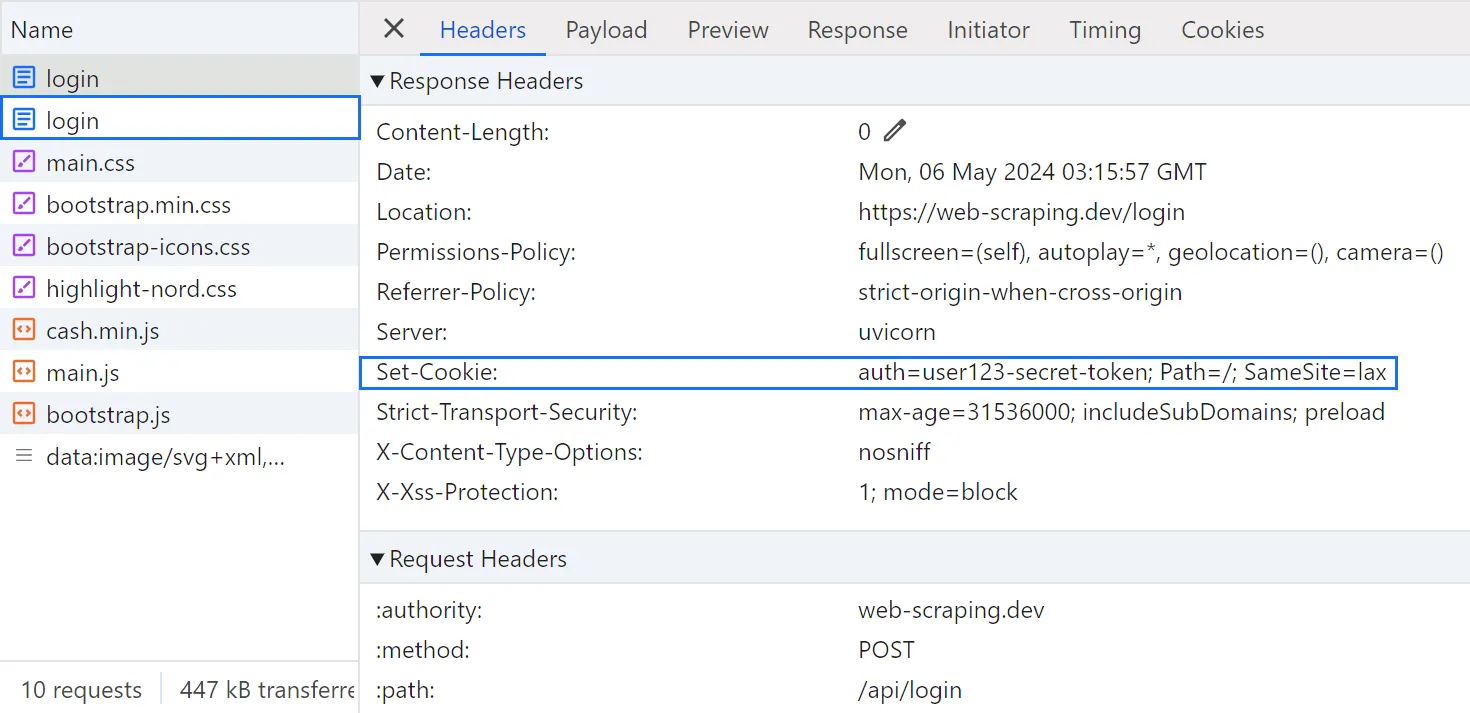
After following the above steps, you will find the responsible background requests captured:

From the above image, we can see that there are two requests sent to the same URL:
- Form
POSTrequest with the login credentials in the payload, which returns the authentication token with the response. GETrequest with the retrieved token in the payload to retrieve the HTML data behind the login form.
To scrape the form of our target web page, we'll replicate the above two requests within our script. The easiest way to replicate them is by copying as cURL or importing them to Postman:
import asyncio
from parsel import Selector
from httpx import AsyncClient

# initializing a async httpx client
client = AsyncClient(
    headers = {
        "content-type": "application/x-www-form-urlencoded",
        "cookie": "cookiesAccepted=true",
        "user-agent": "Mozilla/5.0 (Windows NT 10.0; Win64; x64) AppleWebKit/537.36 (KHTML, like Gecko) Chrome/124.0.0.0 Safari/537.36"
    }
)

async def retrieve_auth_token(url: str):
    """parse the auth token value from the response headers"""
    # login credentials
    body = "username=user123&password=password"
    response = await client.post(url, data=body)
    return response.headers["set-cookie"].split(";")[0]


async def scrape_forms(url: str):
    """scrape login form and parse the data behind it"""
    token = await retrieve_auth_token(url="https://web-scraping.dev/api/login")
    client.headers["cookie"] = f"{token};cookiesAccepted=true"
    response = await client.get(url)
    selector = Selector(response.text)
    # parse the retrieved HTML data
    print(f"the secret message is {selector.css('div#secret-message::text').get()}")
    "the secret message is 🤫"


if __name__ == "__main__":
    asyncio.run(scrape_forms(
        url="https://web-scraping.dev/login"
    ))
In the above code, we start by initiating an httpx client with the request headers and use it to send the form POST request for the auth token cookie retrieval. Then, we utilize the obtained auth token while requesting the target web page itself.
Note that the first request for retrieving the auth token can follow redirects, which dispenses the need for manual cookie configuration:
import asyncio
from parsel import Selector
from httpx import AsyncClient

client = AsyncClient(
    headers = {
        # same request headers
    },
    follow_redirects=True # enable rediretions
)

async def retrieve_auth_token(url: str):
    """parse the auth token value from the response headers"""
    # login credentials
    body = "username=user123&password=password"
    response = await client.post(url, data=body)
    selector = Selector(response.text)
    print(f"the secret message is {selector.css('div#secret-message::text').get()}")
    "the secret message is 🤫"
For further details on web scraping hidden APIs, refer to our dedicated guide.

Scrape Forms With Headless Browsers
Another alternative for scraping forms is using headless browsers. We'll explore automating the regular browser actions using Selenium, Playwright, and Puppeteer.
Selenium
Let's start with Selenium. Since it requires the web driver binaries to be installed, we'll install Selenium alongside webdriver-manager using the following pip command:
pip install selenium webdriver-manager
After the webdriver-manager is installed, use it to download the driver binaries automatically for the desired browser:
from selenium import webdriver
from selenium.webdriver.chrome.service import Service as ChromeService
from webdriver_manager.chrome import ChromeDriverManager

driver = webdriver.Chrome(service=ChromeService(ChromeDriverManager().install()))
To scrape forms with Selenium, we'll use Selenium's expected conditions and find elements to navigate the form:
from selenium import webdriver
from selenium.webdriver.chrome.service import Service as ChromeService
from webdriver_manager.chrome import ChromeDriverManager
from selenium.webdriver.support.wait import WebDriverWait
from selenium.webdriver.support import expected_conditions as EC
from selenium.webdriver.common.by import By


driver = webdriver.Chrome(service=ChromeService(ChromeDriverManager().install()))

driver.get("https://web-scraping.dev/login?cookies=")

# define a timeout
wait = WebDriverWait(driver, timeout=5)

# accept the cookie policy
wait.until(EC.element_to_be_clickable((By.CSS_SELECTOR, "button#cookie-ok")))
driver.find_element(By.CSS_SELECTOR, "button#cookie-ok").click()

# wait for the login form
wait.until(EC.element_to_be_clickable((By.CSS_SELECTOR, "button[type='submit']")))

# fill in the login credentails
username_button = driver.find_element(By.CSS_SELECTOR, "input[name='username']")
username_button.clear()
username_button.send_keys("user123")

password_button = driver.find_element(By.CSS_SELECTOR, "input[name='password']")
password_button.clear()
password_button.send_keys("password")

# click the login submit button
driver.find_element(By.CSS_SELECTOR, "button[type='submit']").click()

# wait for an element on the login redirected page
wait.until(EC.presence_of_element_located((By.CSS_SELECTOR, "div#secret-message")))

secret_message = driver.find_element(By.CSS_SELECTOR, "div#secret-message").text
print(f"The secret message is: {secret_message}")
"The secret message is: 🤫"

# close the browser
driver.quit()
The workflow of the above form scraping code is fairly straightforward: the driver waits for the elements to load, fills, and clicks them. Finally, it extracts form data.
For further details on web scraping with Selenium, refer to our dedicated guide.

Playwright
Playwright is a straightforward Python library for browser automation. First, install it using the followingpip command:pip install playwright
After Playwright is successfully installed, use the playwright install command to download the desired browser driver binaries:
playwright install chromium
Similar to the previous code snippet, we'll scrape forms with Playwright using timeouts and click methods:
from playwright.sync_api import sync_playwright

with sync_playwright() as playwright:
    browser = playwright.chromium.launch()
    context = browser.new_context()
    page = context.new_page()

    # request the target web page
    page.goto("https://web-scraping.dev/login?cookies=")

    # accept the cookie policy
    page.click("button#cookie-ok")

    # wait for the login form
    page.wait_for_selector("button[type='submit']")

    # wait for the page to fully load
    page.wait_for_load_state("networkidle")

    # fill in the login credentials
    page.fill("input[name='username']", "user123")
    page.fill("input[name='password']", "password")

    # click the login submit button
    page.click("button[type='submit']")

    # wait for an element on the login redirected page
    page.wait_for_selector("div#secret-message")

    secret_message = page.inner_text("div#secret-message")
    print(f"The secret message is {secret_message}")
    "The secret message is 🤫"
Here, we use the Playwright page methods to wait for selectors or load states. Then, we navigate the form by clicking and filling elements. Finally, the script parses the final web page data using CSS selectors.
Have a look at our dedicated guide on Playwright for the full details on using it for web scraping.

Puppeteer
Finally, let's explore using Puppeteer to extract form data. First, install it using npm:
npm install puppeteer
Since Puppeteer automatically downloads the related Chrome driver binaries, all we have to do is declare the browser actions directly:
const puppeteer = require('puppeteer');

(async () => {
    const browser = await puppeteer.launch({
        headless: false
    })

    // create a browser page
    const page = await browser.newPage();

    // go to the target web page
    await page.goto(
        'https://web-scraping.dev/login?cookies=',
        { waitUntil: 'domcontentloaded' }
    );

    // wait for 500 milliseconds
    await new Promise(resolve => setTimeout(resolve, 500));

    // accept the cookie policy
    await page.click('button#cookie-ok');

    // wait for the login form
    await page.waitForSelector('button[type="submit"]');

    // fill in the login credentials
    await page.$eval('input[name="username"]', (el, value) => el.value = value, 'user123');
    await page.$eval('input[name="password"]', (el, value) => el.value = value, 'password');
    await new Promise(resolve => setTimeout(resolve, 500));

    // click the login button and wait for navigation
    await page.click('button[type="submit"]');
    await page.waitForSelector('div#secret-message');

    secretMessage = await page.$eval('div#secret-message', node => node.innerHTML);
    console.log(`The secret message is ${secretMessage}`);

    // close the browser
    await browser.close();
})();
Let's break down the above form scraping code:
- Initiate a Puppeteer instance in the headful mode.
- Define timeouts to wait for the elements.
- Fill and click the elements using their equivalent selectors.
- Parse the HTML behind the login page.
For further details on web scraping with Puppeteer, refer to our dedicated guide.

Powering Up with ScrapFly
We have explored using both HTTP clients and headless browsers for scraping forms. While HTTP clients are more efficient and use less resources, they are more complicated and can be challanging with complex use cases. This is where services like Scrapfly come in handy!

ScrapFly provides web scraping, screenshot, and extraction APIs for data collection at scale.
- Anti-bot protection bypass - scrape web pages without blocking!
- Rotating residential proxies - prevent IP address and geographic blocks.
- JavaScript rendering - scrape dynamic web pages through cloud browsers.
- Full browser automation - control browsers to scroll, input and click on objects.
- Format conversion - scrape as HTML, JSON, Text, or Markdown.
- Python and Typescript SDKs, as well as Scrapy and no-code tool integrations.
For example, here's how we can approach our form scraping example using ScrapFly. All we have to do is enable the asp parameter to bypass web scraping blocking, enable the render_js feature, and automate the headless browser by declaring the js_scenario steps:
from scrapfly import ScrapeConfig, ScrapflyClient, ScrapeApiResponse

scrapfly = ScrapflyClient(key="Your ScrapFly API key")

api_response: ScrapeApiResponse = scrapfly.scrape(
    ScrapeConfig(
        # target website URL
        url="https://web-scraping.dev/login",
        # bypass anti scraping protection
        asp=True,
        # set the proxy location to a specific country
        country="US",
        # # enable the cookies policy
        headers={"cookie": "cookiesAccepted=true"},
        # enable JavaScript rendering
        render_js=True,
        # scroll down the page automatically
        auto_scroll=True,
        # add JavaScript scenarios
        js_scenario=[
            {"click": {"selector": "button#cookie-ok"}},
            {"fill": {"selector": "input[name='username']","clear": True,"value": "user123"}},
            {"fill": {"selector": "input[name='password']","clear": True,"value": "password"}},
            {"click": {"selector": "form > button[type='submit']"}},
            {"wait_for_navigation": {"timeout": 5000}}
        ],
        # take a screenshot
        screenshots={"logged_in_screen": "fullpage"},
        debug=True
    )
)

# get the HTML from the response
html = api_response.scrape_result['content']

# use the built-in Parsel selector
selector = api_response.selector
print(f"The secret message is {selector.css('div#secret-message::text').get()}")
"The secret message is 🤫"
FAQ
To wrap up this guide, let's have a look at some frequently questions about web scraping forms.
How to scrape login forms?
Login forms require authentication tokens to present in the request payload. These auth tokens can be added either as a request header or cookie to authoritze the data behind the login form.
How to send form POST requests using web scraping?
To send a form POST request while web scraping, change the request HTTP method and add the form body to the request payload:
import httpx  # or requests

# send the form POST request with the form body
login_response = httpx.post(
    "https://web-scraping.dev/api/login",
    data={
        "username": "user123",
        "password": "password",
    },
)
print(dict(login_response.cookies))
{"auth": "user123-secret-token"}
# use the cookie with further requests
Summary
In this guide, we explained how to scrape forms using Python. We went through a step-by-step guide on extracting data behind forms using httpx, Selenium, Playwright, and Puppeteer through either of two approaches:
- Replicating form POST requests using HTTP requests.
- Using headless browsers to automate the form submission.


