

Building an MCP (Model Context Protocol) server allows your applications to interact directly with large language models by exposing custom tools, resources, and prompts. Whether you're building a plugin-like system for LLMs or enabling external AI integrations, the MCP server serves as a crucial bridge.
In this guide, we'll walk through how to build a simple MCP server in Python using a calculator example.
Key Takeaways
Build an MCP server in Python to expose custom tools, resources, and prompts for LLM integration, enabling direct communication between AI models and your applications.
- Create MCP servers using Python with tools, resources, and prompts for LLM integration
- Implement stdio transport for communication between MCP servers and AI models
- Define custom tools as Python functions that can be called by language models
- Expose static and dynamic resources for model access to files and data
- Implement exponential backoff retry logic with 403 status code detection for rate limiting
- Handle JSON-RPC communication protocol for seamless AI model integration
What is the Model Context Protocol (MCP)?
The model context protocol (MCP) is an open standard developed to let external tools, APIs, or plugins communicate with large language models (LLMs). An MCP server is a program you run locally or remotely that LLMs (like Claude or those in Cursor) can connect to and call defined functions, query resources, or use prompt templates.
In MCP, there are three key components:
- Tools: Functions that can be called by the model.
- Resources: Static or dynamic files or data the model can request.
- Prompts: Templated messages that guide the model's output.
For more details about MCP checkout our article:

Understanding the Basics of MCP Communication
Before diving into code, it’s essential to understand how models interact with your server. MCP servers operate over transports like stdio, http, or websocket. A host like Cursor will send JSON-based requests, and your server responds with tool results, prompt content, or resource data.
This design allows the model to dynamically call your tools or read your files just like a plugin system.
Why Use MCP Instead of Other APIs?
MCP is purpose-built for LLMs. Unlike REST APIs that require explicit engineering effort to query, MCP integrates directly with model interfaces. Your functions become accessible as if the model "knew" how to call them.
This makes it ideal for prototyping, teaching, internal tools, and research-driven interfaces.
Setting Up Your Python Environment
First, ensure you have Python 3.10 or later installed. Then, create a virtual environment:
python -m venv mcp-env
source mcp-env/bin/activate  # On Windows: mcp-env\Scripts\activate
This creates an isolated environment for your project, helping avoid conflicts with other Python packages.
Install the MCP SDK:
pip install mcp "mcp[cli]"The mcp package provides the server framework and CLI utilities. The [cli] extra installs additional command-line tools.
To verify installation:
mcp versionYou should see the installed version number, confirming a successful setup.
Creating Your First MCP Server (Calculator Example)
Let’s start with a basic calculator tool that adds two numbers. Create a file named calculator.py:
from mcp.server.fastmcp import FastMCP  # Import FastMCP, the quickstart server base

mcp = FastMCP("Calculator Server")  # Initialize an MCP server instance with a descriptive name

@mcp.tool()  # Register a function as a callable tool for the model
def add(a: int, b: int) -> int:
    """Add two numbers and return the result."""
    return a + b  # Simple arithmetic logic

if __name__ == "__main__":
    mcp.run(transport="stdio")  # Run the server, using standard input/output for communication
This script defines a minimal MCP server with one tool, add. The @mcp.tool() decorator tells the MCP framework that this function should be available to connected LLMs.
Using Context and Advanced Tools
MCP tools can go beyond simple math they can access the internet, return rich media like images, and be written asynchronously. Here are a few examples to extend your calculator-themed server with more functionality.
Body Mass Index (BMI) Calculator Tool
This tool calculates BMI, which is a useful health-related metric:
@mcp.tool()
def calculate_bmi(weight_kg: float, height_m: float) -> float:
    """Calculate BMI given weight in kg and height in meters"""
    return round(weight_kg / (height_m ** 2), 2)
This fits well into a calculator suite for health and fitness features.
Live Exchange Rate Fetcher (Async)
Here’s how to add a tool that fetches live currency exchange rates:
import httpx

@mcp.tool()
async def get_exchange_rate(from_currency: str, to_currency: str) -> str:
    """Fetch current exchange rate from one currency to another."""
    async with httpx.AsyncClient() as client:
        response = await client.get(
            f"https://api.exchangerate-api.com/v4/latest/{from_currency}"
        )
        rates = response.json().get("rates", {})
        rate = rates.get(to_currency)
        if rate:
            return f"1 {from_currency} = {rate} {to_currency}"
        return "Unable to fetch exchange rate."
This can make your calculator server useful for travelers and finance apps.
Previewing Image-Based Calculations
You can also process images using the built-in Image class. For instance, previewing a graph or bill snapshot:
from mcp.server.fastmcp import Image
from PIL import Image as PILImage

@mcp.tool()
def generate_thumbnail(image_path: str) -> Image:
    """Generate a thumbnail for a provided image (e.g., bill or graph)."""
    img = PILImage.open(image_path)
    img.thumbnail((120, 120))
    return Image(data=img.tobytes(), format="png")
This could be used when the LLM is reviewing visual data like receipts or chart screenshots.
Using Context to Track Progress
Some tasks, like parsing multiple calculation files, may take time. MCP provides a Context object to manage progress and logging:
from mcp.server.fastmcp import Context

@mcp.tool()
async def batch_process(files: list[str], ctx: Context) -> str:
    """Simulate batch calculation from uploaded files with progress feedback."""
    for i, file in enumerate(files):
        ctx.info(f"Processing file {file}")
        await ctx.report_progress(i + 1, len(files))
        data, mime_type = await ctx.read_resource(f"file://{file}")
    return "Batch processing complete"
This gives both you and the model transparency into what's happening behind the scenes ideal for long-running tools.
Adding More Tools
Expand your calculator with subtraction, multiplication, and division:
@mcp.tool()
def subtract(a: int, b: int) -> int:
    """Subtract the second number from the first."""
    return a - b

@mcp.tool()
def multiply(a: int, b: int) -> int:
    """Multiply two numbers."""
    return a * b

@mcp.tool()
def divide(a: float, b: float) -> float:
    """Divide the first number by the second. Raises error on division by zero."""
    if b == 0:
        raise ValueError("Division by zero")
    return a / b
Each tool is explicitly documented. If an LLM queries available tools, it will see these docstrings, helping it understand the correct usage.
Organizing Your MCP Project
For beginners, it helps to structure your code into folders:
mcp-calculator/
├── calculator.py
├── tools/
│   └── arithmetic.py
├── prompts/
│   └── templates.txt
└── docs/
    └── usage.txt
Then import and register each tool separately. This improves maintainability and scaling.
Exposing Resources
In MCP, resources can be either static files or dynamic responses. Here's how to define a dynamic resource using the @mcp.resource() decorator:
# Add a dynamic greeting resource
@mcp.resource("calculator://greet/{name}")
def calculator_greeting(name: str) -> str:
    """Get a personalized greeting"""
    return f"Hello, {name}! Ready to calculate something today?"
This makes the URL greeting://yourname available to the model. When the model queries this resource, the function will execute and return the corresponding greeting.
You can also use static resources like text files for documentation or data.
Create a docs folder and add a file named usage.txt:
This MCP server can perform basic arithmetic functions. Use tools like add, subtract, multiply, and divide.And use:
@mcp.resource("usage://guide")
def get_usage() -> str:
    with open("docs/usage.txt") as f:
        return f.read()
This returns the content of the file when requested by the model.
Creating Prompts
In MCP, prompts can also be defined using functions decorated with @mcp.prompt(). This allows for dynamic, conditional, and reusable prompt generation.
Here’s an example that combines all four operations into a single prompt function:
@mcp.prompt()
def calculator_prompt(a: float, b: float, operation: str) -> str:
    """Prompt for a calculation and return the result."""
    if operation == "add":
        return f"The result of adding {a} and {b} is {add(a, b)}"
    elif operation == "subtract":
        return f"The result of subtracting {b} from {a} is {subtract(a, b)}"
    elif operation == "multiply":
        return f"The result of multiplying {a} and {b} is {multiply(a, b)}"
    elif operation == "divide":
        try:
            return f"The result of dividing {a} by {b} is {divide(a, b)}"
        except ValueError as e:
            return str(e)
    else:
        return "Invalid operation. Please choose add, subtract, multiply, or divide."
This function returns a human-readable summary for any supported operation. The model can invoke it with arguments, and receive consistent, contextual output.
Running the Server
To run the server:
mcp run path/to/calculator.pyYou can connect it with a tool like Cursor or Claude Desktop. In Cursor:
- Go to Cursor
Settings>MCP. - Click
Add new global MCP server.
Cursor stores MCP server definitions in a JSON format. You can add your server manually to the configuration like this:
{
    "mcpServers": {
      "local-mcp": {
        "command": "python",
        "args": [
          "path/to/your/local/mcp/calculator.py"
        ]
      }
    }
 }
Once connected, Cursor will automatically detect your tools and show them under your server listing.
You should see something like this:

Then test it with natural language prompts like:
-
Add 7 and 5 -
What's 12 divided by 4?
Where and How to Test Your MCP Server
The easiest way to test your MCP server is by running it with the MCP CLI tool, which includes a local dashboard for interacting with your prompts and tools.
Run the Dev Dashboard
Use the following command in your terminal:
mcp dev ./calculator.pyThis command launches a local dev dashboard. Once the server is running, it will open a browser window where you can:
- View all registered tools and prompts
- Test each prompt by filling in parameters
- See the results and any errors in real time
Which will result of this screen:
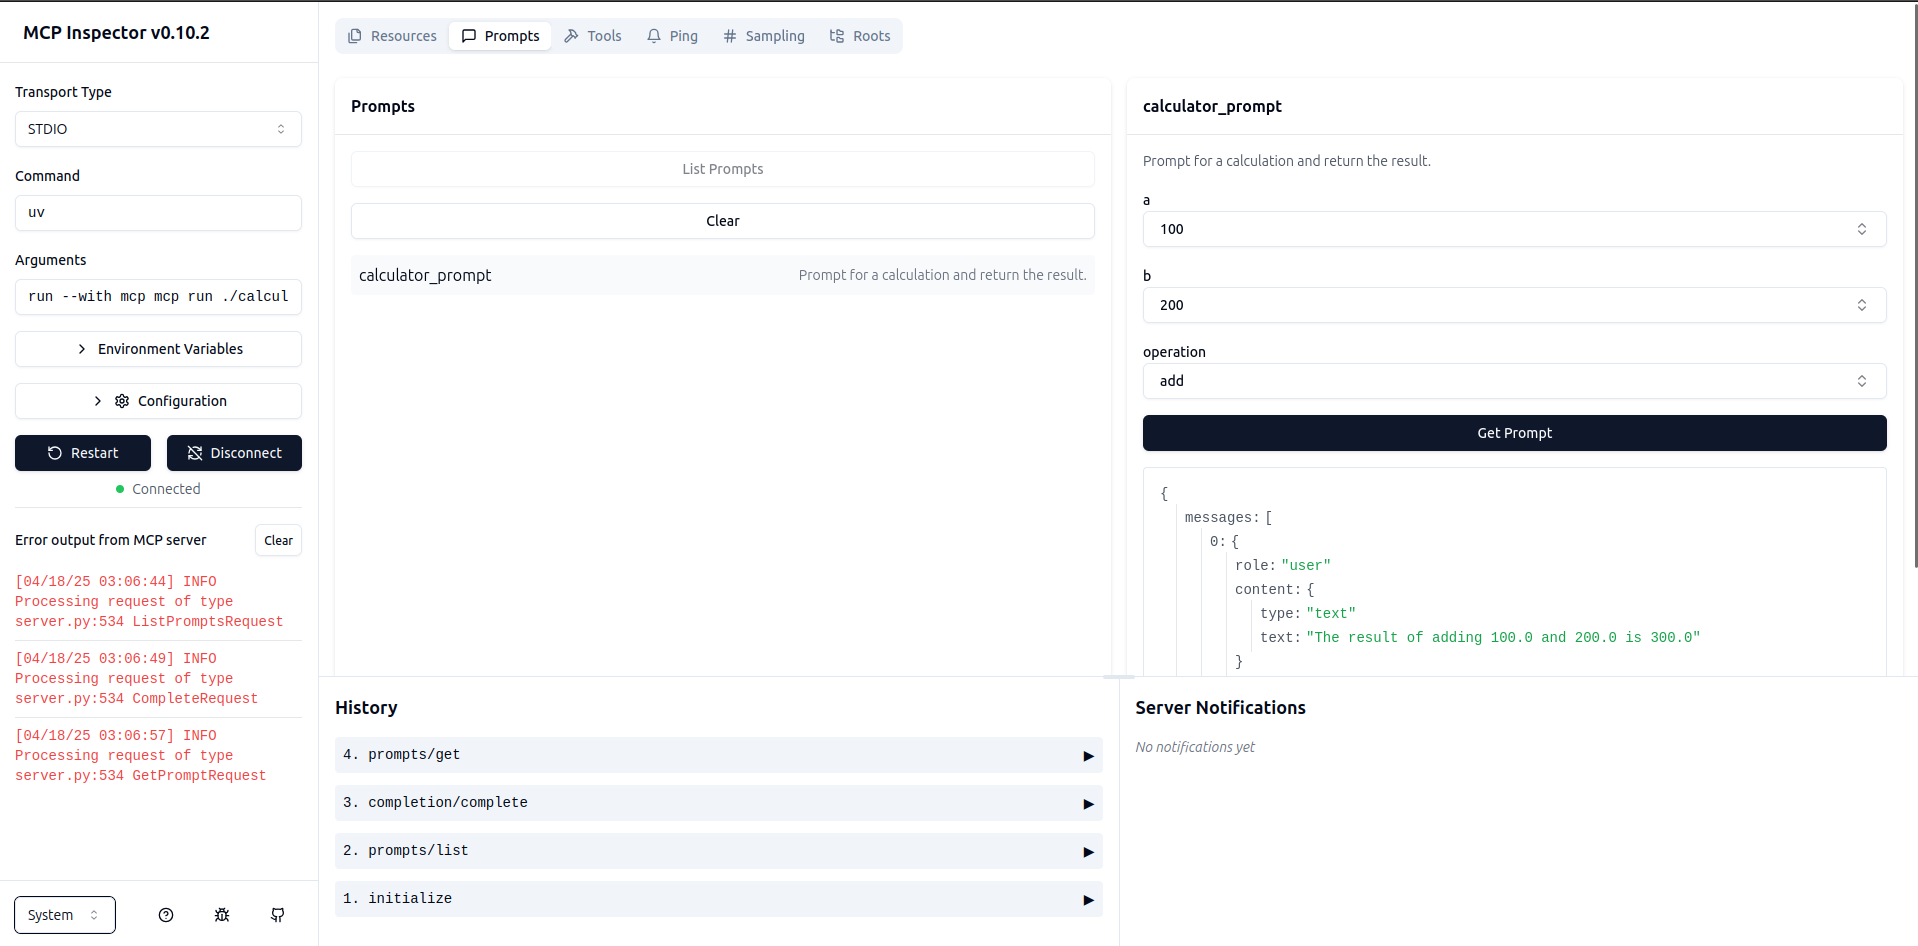
This makes mcp dev the most straightforward way to test and iterate on your MCP server.
Real-World Use Cases for MCP Servers
MCP servers are useful beyond experiments they help connect your code to language models in practical, meaningful ways.
- Internal tools: Let models assist with tasks like running calculations, generating reports, or querying databases.
- Customer support bots: Provide models access to live data, documentation, or helpdesk tools.
- Education: Build interactive learning aids for math, science, or coding using model-driven prompts and tools.
These examples show how MCP can add model interaction to everyday workflows, making your applications smarter and more interactive.
Power-up with Scrapfly

Scrapfly Proxy Saver is a powerful middleware solution that optimizes your existing proxy connections, reducing bandwidth costs while improving performance and stability.
- Save up to 30% bandwidth - optimize proxy usage with built-in data stubbing and compression!
- Fingerprint impersonation - bypass proxy detection with authentic browser profiles.
- Ad and junk blocking - automatically filter unwanted content to reduce payload size.
- Parameter forwarding - seamlessly pass country and session settings to upstream proxies.
- Built-in caching - automatically cache results, redirects, and CORS requests.
- Works with all major proxy providers including Oxylabs, Bright Data, and many more.
FAQ
How do I create a dynamic resource?
Use the @mcp.resource() decorator with a dynamic path. For example, calculator://greet/{name} allows models to access personalized data. The function will be called with the provided parameter.
What types can MCP tools return?
MCP tools can return basic data types like strings, numbers, lists, and even binary media using the Image class. The return type should match the expected use by the model or interface calling it.
Can I use async functions in my tools?
Yes, MCP fully supports async def functions. These are useful for non-blocking operations like fetching data from APIs or processing large files without stalling your server.
Summary
This guide covered how to build an MCP server in Python using a calculator app as a clear, hands-on example. We explored the core components of the Model Context Protocol: tools, resources, and prompts, and how each one allows large language models to interact dynamically with your code. You learned how to implement basic and advanced tools including asynchronous functions, handle user input with custom prompts, and expose data through both static and dynamic resources.
We also showed how to test your server locally using mcp dev, connect it to an LLM interface like Cursor, and structure your project for real-world development. Whether you're building internal utilities, educational tools, or LLM-driven interfaces, MCP provides a lightweight yet powerful standard to bridge AI and software.


