

Automating Chrome screenshots can save you valuable time and resources, whether you need to capture website content, document visual changes, or create marketing materials. This article explores various methods to automate Chrome screenshots, from using browser automation libraries like Playwright, Puppeteer and Selenium to leveraging the built-in developer tools and screenshot extensions.
In this article we'll cover Playwright, Selenium, Puppeteer, common challenges, using direct browser commands, developer tools, Chrome extensions and an introduction to the Scrapfly Screenshot API.
Key Takeaways
Learn how to automate chrome screenshots using Playwright, Selenium, Puppeteer, and Chrome extensions for programmatic visual content capture.
- Implement Playwright, Selenium, and Puppeteer for automated Chrome screenshot capture with cross-browser compatibility
- Configure browser automation with headless mode, viewport settings, and element-specific screenshot capture
- Use Chrome DevTools Protocol and browser extensions for advanced screenshot automation and workflow optimization
- Implement screenshot API integration with ScrapFly for scalable and reliable visual content capture
- Configure automated screenshot scheduling and batch processing for efficient content monitoring workflows
- Handle dynamic content loading and pop-up blocking for accurate screenshot capture
Why Automate Chrome Screenshots?
Automating the process of capturing screenshots offers several advantages across various domains. For businesses, it streamlines content monitoring, visual regression testing, and marketing material creation.
For developers, automated screenshots can be invaluable for debugging and documenting UI changes. Even for personal use, it can simplify archiving web pages or sharing visual information. The ability to programmatically capture these images unlocks powerful workflows and improves efficiency.
Now that you understand the benefits, let's explore the 10 different ways to capture chrome screenshot (in no particular order) 👇
10. Playwright
Playwright is a powerful library that allows you to automate Chromium, Firefox, and WebKit browsers. Its simple API and cross-browser compatibility make it a great choice for automating Chrome screenshots.
from playwright.sync_api import sync_playwright

with sync_playwright() as p:
    # Launch a browser instance
    browser = p.chromium.launch()
    # Create a new page
    page = browser.new_page()
    # Go to the desired URL
    page.goto("https://web-scraping.dev/product/1")
    # Take a screenshot and save it to a file
    page.screenshot(path="example.png")
    # Take a full page screenshot (all scrollable area)
    page.screenshot(path="example_fullpage.png", full_page=True)
    # Tip: scroll to the bottom of the page to trigger events and load dynamic elements
    page.evaluate("window.scrollTo(0, document.body.scrollHeight)")
    # Capture specific element only by using locators with CSS selectors
    review_locator = page.locator(".review")
    review_locator.screenshot(path="example_review.png")
    # Close the browser
browser.close()// Require playwright
const { chromium } = require("playwright");
(async () => {
// Launch a browser instance
const browser = await chromium.launch();
// Create a new page
const page = await browser.newPage();
// Go to the desired URL
await page.goto("https://web-scraping.dev/product/1");
// Take a screenshot and save it to a file
await page.screenshot({ path: "example.png" });
// Take a full page screenshot (all scrollable area)
await page.screenshot({ path: "example_fullpage.png", fullPage: true });
// Tip: scroll to the bottom of the page to trigger events and load dynamic elements
await page.evaluate(() => window.scrollTo(0, document.body.scrollHeight));
// capture specific element only by using locators with CSS selectors
let reviewLocator = page.locator(".review");
await reviewLocator.screenshot({ path: "example_review.png" });
// Close the browser
await browser.close();
})();In the above code, we first import the chromium module from the Playwright library. Then we launch a Chromium browser instance, create a new page, navigate to https://web-scraping.dev/products, take a screenshot of the entire page, save it as "example.png", and finally close the browser.
Why Choose Playwright for Screenshot Automation?
Playwright provides a flexible and efficient way to capture Chrome screenshots with its powerful automation capabilities.
- Cross-browser support – Works with Chromium, Firefox, and WebKit using a single API.
- Multi-language compatibility – Supports JavaScript, Python, C#, and more.
- Modern API – Features auto-waiting, headless execution, and advanced debugging tools.
- Reliable and stable – Reduces flaky tests and ensures consistent automation.
Next, let's look at another powerful automation library, Selenium.
9. Selenium
Selenium is another popular open-source framework primarily known for automated website testing. It can also be used to automate Chrome screenshots. Selenium supports multiple programming languages and browsers, offering a flexible approach to automation.
# Import necessary libraries
from selenium import webdriver

# Set up Chrome options
options = webdriver.ChromeOptions()
options.add_argument("start-maximized") # open Browser in maximized mode
options.add_argument("disable-infobars") # disabling infobars
options.add_argument("--disable-extensions") # disabling extensions
options.add_argument("--headless") # Run Chrome in headless mode (no GUI)

# Create a Chrome driver instance
driver = webdriver.Chrome(options=options)

# Navigate to the desired URL
driver.get("https://web-scraping.dev/products")

# Take a screenshot and save it to a file
driver.save_screenshot("example_selenium.png")

# Close the driver
driver.quit()
In this Python code, we first import the webdriver module from Selenium. We then configure Chrome options, including running it in headless mode. Next, we create a Chrome driver instance, navigate to https://web-scraping.dev/products, capture a screenshot of the full page, save it as "example_selenium.png", and close the browser instance.
Why Choose Selenium for Screenshot Automation?
Selenium is a widely used and adaptable automation tool that supports multiple browsers and programming languages, making it ideal for Chrome screenshot automation.
- Broad browser compatibility – Works with Chrome, Firefox, Edge, and Safari.
- Multi-language support – Supports Python, Java, C#, and more.
- Well-established and flexible – A mature framework with a large community and extensive documentation.
- Bypasses bot detection – Supports undetected chromedriver to bypass bot blocking.
To learn more about how to bypass web scraping blocking with undetected chromedriver see our extensive article:

Now that you've seen how to use Selenium, let's investigate Puppeteer.
8. Puppeteer
Puppeteer is a Node library developed by Google for controlling headless Chrome or Chromium. It provides a high-level API to control Chrome instances, making it suitable for tasks like automated testing, web scraping, and, of course, taking Chrome screenshots.
const puppeteer = require("puppeteer");

(async () => {
  // Launch a browser instance
  const browser = await puppeteer.launch();
  // Create a new page
  const page = await browser.newPage();
  // Go to the desired URL
  await page.goto("https://web-scraping.dev/product/1");
  // Take a screenshot and save it to a file
  await page.screenshot({ path: "example_puppeteer.png" });
  // Take a full page screenshot
  await page.screenshot({ path: "example_puppeteer_fullpage.png", fullPage: true });
  // Take a screenshot of a specific element
  let element = await page.$(".review");
  if (element) {
    await element.screenshot({ path: "example_puppeteer_review.png" });
  } else {
    console.log("Element not found");
  }

  // Close the browser
  await browser.close();
})();
The code block above begins by importing the Puppeteer library. A headless browser instance is then launched, a new page is opened, and the script navigates to "https://web-scraping.dev/products". Finally, the screenshot is captured and saved as "example_puppeteer.png" before the browser is closed.
Why Choose Puppeteer for Screenshot Automation?
Puppeteer is a Google-backed automation tool designed specifically for Chrome and Chromium, offering deep browser control and a modern API for seamless screenshot capture.
- Optimized for Chrome – Built and maintained by Google for Chrome and Chromium.
- Simple and modern API – Provides an easy-to-use interface for automation, screenshot capture, and UI testing.
- Headless and full browser control – Supports both headless mode and full browser interaction.
- Great for web scraping – Ideal for screenshot automation, PDF generation, and performance monitoring.
- Bypasses bot detection – Supports Getting started with Puppeteer Stealth to bypass some bot blocking.
Having explored different automation tools, let's consider the obstacles you may encounter.
Screenshot Automation Challenges
Automating Chrome screenshots isn't always a straightforward process. Several common challenges can arise, including pop-ups, dynamically loading content, needing to select specific areas, advertisements obscuring content, and ensuring the performance of the automation script. These issues can lead to incomplete or inaccurate screenshots, requiring robust solutions.
-
Pop-ups: These can appear unexpectedly and block content (like cookie warnings). They may require you to dismiss them programmatically before capturing the screenshot so it's great to have a tool with this capability.
-
Waiting for content to load: For capturing dynamic content, you need to ensure that all elements are fully loaded before taking the screenshot. An optimal tool should have an ability to wait for browser signals like
DOMContentLoadedor specific elements to appear through CSS selectors. -
Targeting Specific Areas: Sometimes, you might only need a screenshot of a specific section of the page. Optimal tool should allow selecting areas to capture using CSS selectors.
-
Advertisements: Advertisements can interfere with the screenshot process, covering parts of the page you want to capture and polluting the visual output.
-
Performance Issues: Poorly optimized automation scripts can slow down the process and consume excessive resources.
Full browser automation tools like Playwright, Selenium, and Puppeteer offer solutions to these challenges, providing features like explicit waits, element selection, and headless mode to streamline the screenshot automation process.
Though, for basic use cases it might not be necessary so next, let's take a look at the most simple option - using direct browser terminal commands.
7. Direct Browser Command
For quick and simple screenshot automation, you can leverage the google-chrome --headless --screenshot command directly from your terminal. This method is useful for basic tasks without the need for extensive scripting.
$ google-chrome --headless --screenshot --window-size=1280,720 https://web-scraping.dev/productsThis command runs Chrome in headless mode, takes a screenshot of https://web-scraping.dev/products with a window size of 1280x720, and saves the screenshot as screenshot.png in the current directory. This approach is straightforward and doesn't require any additional libraries or complex setup.
Automation with Cron
To capture screenshots at scheduled intervals, you can automate this command using cron jobs on Linux/macOS.
To edit or add schedule tasks, open the crontab with:
$ crontab -eThis will open the crontab file in your default text editor (usually vim or nano), where you can add scheduled commands. Then add the screenshot command:
0 * * * * google-chrome --headless --screenshot --window-size=1280,720 https://web-scraping.dev/productsThis ensures that Chrome runs the command every hour without manual intervention, making it useful for monitoring website changes or capturing periodic snapshots.
To check your scheduled tasks, run:
$ crontab -lCrontab offers a simple way to automate very basic Chrome screenshots at regular intervals so if you need something super simple it's a very accessible option.
Tip: Use Developer Tools for Testing
Chrome Developer Tools offer a robust set of features for web development, including the ability to capture screenshots directly within the browser.
This built-in functionality allows you to take full-page screenshots without the need for additional extensions or software. Here's how you can do it:
-
Open Chrome Developer Tools:
- Windows/Linux: Press
Ctrl + Shift + I. - Mac: Press
Cmd + Option + I. - Alternatively, right-click anywhere on the webpage and select "Inspect" from the context menu.
- Windows/Linux: Press
-
Access the Command Menu:
- Windows/Linux: Press
Ctrl + Shift + P. - Mac: Press
Cmd + Shift + P. - This will open the Command Menu, a powerful feature that lets you execute various DevTools commands.
- Windows/Linux: Press
-
Capture the Screenshot:
- In the Command Menu, start typing "screenshot" to filter the available commands.
- Select "Capture full size screenshot" from the list.
- Chrome will process the command and automatically save a PNG image of the entire webpage to your default download location.
This method is particularly useful for capturing the complete content of a webpage, including areas that require scrolling.
6. Chrome Screenshot Extensions
Numerous Chrome extensions are available that provide automated screenshot capabilities. These extensions often offer features like full-page capture, region selection, and annotation tools, simplifying the screenshot process. Some popular extensions are detailed below:
| Extension | Features | Price |
|---|---|---|
| FireShot | Full page capture, download as image or PDF | Free |
| GoFullPage | Full page capture, annotation tools, direct editing | Free/Premium |
| Awesome Screenshot | Full page & partial capture, annotation, blur sensitive info, screen recording | Free/Premium |
Chrome extensions are great for quick and simple screenshot tasks, offering a range of features to enhance your screenshot workflow. However, they're not suitable for large scale automation tasks and for that lets take a look at cloud service option by Scrapfly next.
Scrapfly Screenshot API
Scrapfly's Screenshot API is a cloud-based service that allows you to capture website screenshots at scale:
- Bypass bot blocking and captchas automatically
- Block ads, banners, and pop-ups to ensure clean screenshots
- Select areas to capture using CSS selectors or capture the full page
- Automatically scroll to the bottom of the page to load everything
- And much more!
The Screenshot API is designed to simplify the large scale screenshot capture operations and resolve all the screenshot capture challenges automatically so it's a great option for those who need to capture screenshots at scale.
For a detailed comparison of available providers, see our guide on the best screenshot APIs.
Let's take a look at some uses next 👇
5. Using Zapier
Zapier is a widely-used no-code automation platform that connects various apps and services. By integrating Scrapfly's Screenshot API with Zapier, you can set up automated workflows (known as "Zaps") to capture screenshots based on specific triggers.
Getting Started with Zapier
To begin automating website screenshots with Scrapfly's Screenshot API and Zapier, follow these steps:
- Create Accounts: Sign up for free accounts on both Scrapfly and Zapier.
- Obtain API Key: Retrieve your Scrapfly API key from your Scrapfly dashboard.
- Set Up a Zap: In Zapier, create a new Zap and add Scrapfly as an action to capture screenshots based on your defined triggers.
Example Use Cases
Integrating Scrapfly's Screenshot API with Zapier opens up a range of practical applications to streamline your workflows. Here are some examples:
- Scheduled Screenshots: Automatically capture screenshots of a webpage at regular intervals and save them to cloud storage or send via email.
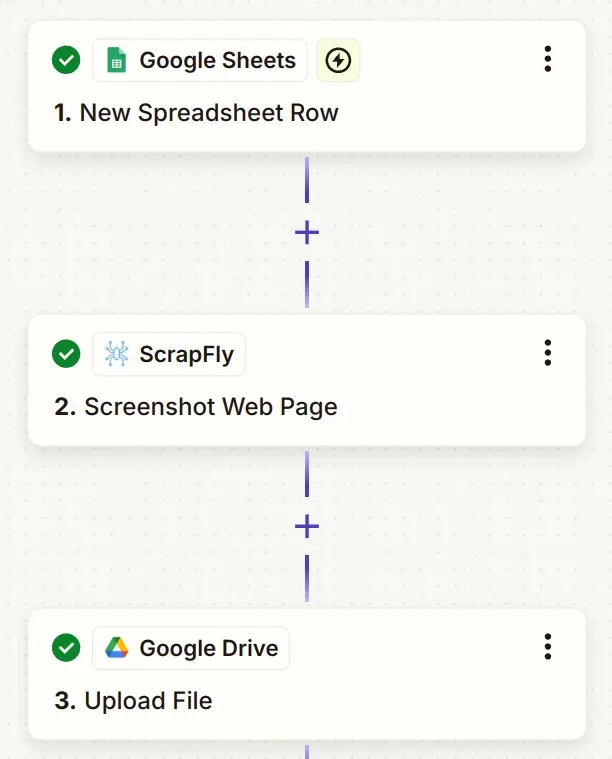
- Event-Driven Captures: Trigger a screenshot capture when a new row is added to a Google Sheet or when a specific event occurs in another app.
For a real-life example, see this Zapier.com template that captures screenshots from Google Sheets and saves them to Google Drive:
For detailed instructions and example templates, refer to the Scrapfly Zapier Integration Guide.
4. Using Make.com
Make (formerly Integromat) is another powerful no-code automation tool that allows users to design complex workflows with a visual editor. Integrating Scrapfly's Screenshot API with Make enables automated screenshot captures within your workflows.
Getting Started with Make.com Screenshots
To begin automating website screenshots with Scrapfly's Screenshot API and Make, follow these steps:
- Create Accounts: Sign up for free accounts on both Scrapfly and Make.
- Obtain API Key: Retrieve your Scrapfly API key from your Scrapfly dashboard.
- Set Up a Scenario: In Make, create a new scenario and add Scrapfly modules to capture screenshots based on your defined triggers.
Example Use Cases
Integrating Scrapfly's Screenshot API with Make opens up a range of practical applications to streamline your workflows. Here are some examples:
- Data Monitoring: Capture screenshots of a webpage when specific data changes are detected.
- Reporting: Generate periodic screenshots of a webpage and compile them into reports.
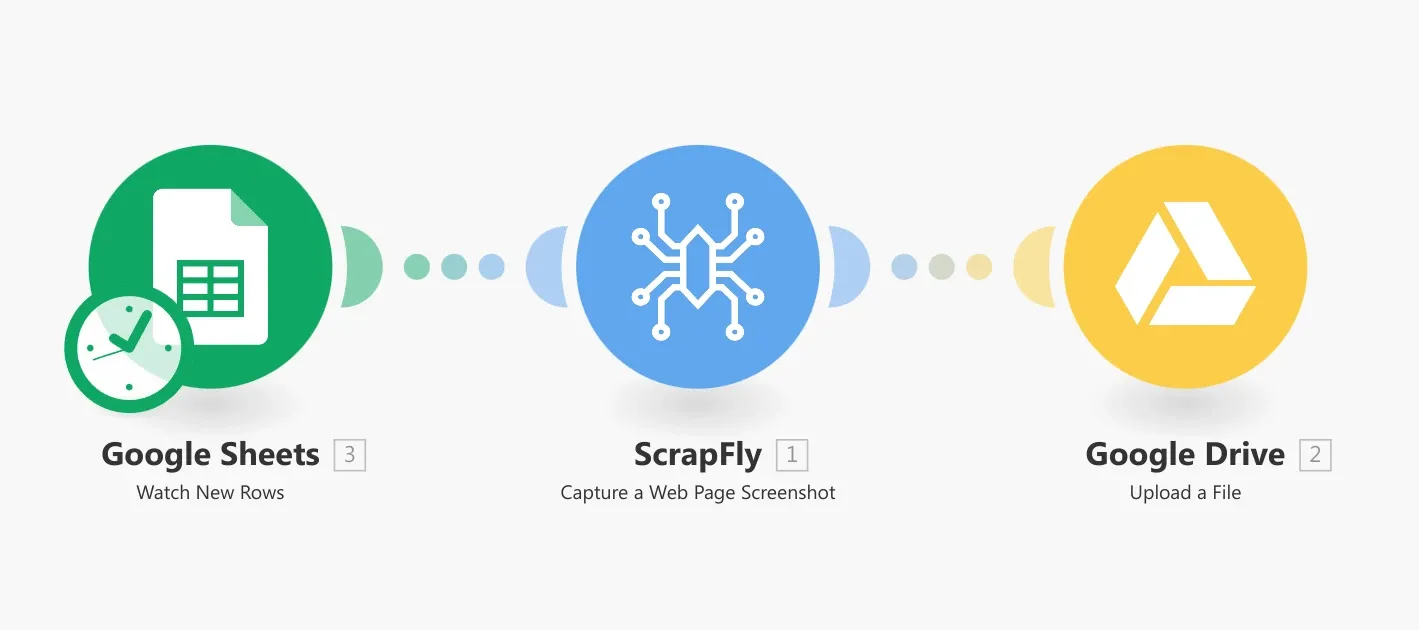
For a real life example, see this Make.com template that captures screenshots from Google Sheets and saves them to Google Drive:
For detailed instructions and more example templates, refer to the Scrapfly Make Integration Guide.
3. Using N8N
n8n is an open-source workflow automation tool that provides flexibility in designing custom workflows. Integrating Scrapfly's Screenshot API with n8n allows for advanced automation capabilities.
Getting Started with N8N Screenshots
To begin automating website screenshots with Scrapfly's Screenshot API and N8N, follow these steps:
- Create Accounts: Sign up for a free account on Scrapfly.
- Obtain API Key: Retrieve your Scrapfly API key from your Scrapfly dashboard.
- Install Scrapfly Node: In your n8n instance, install the Scrapfly community node to access Scrapfly's functionalities.
Example Use Cases
- Custom Workflows: Design workflows that capture screenshots based on complex, multi-step triggers.
- Integration with Other Services: Combine screenshot captures with other services and APIs for comprehensive automation solutions.
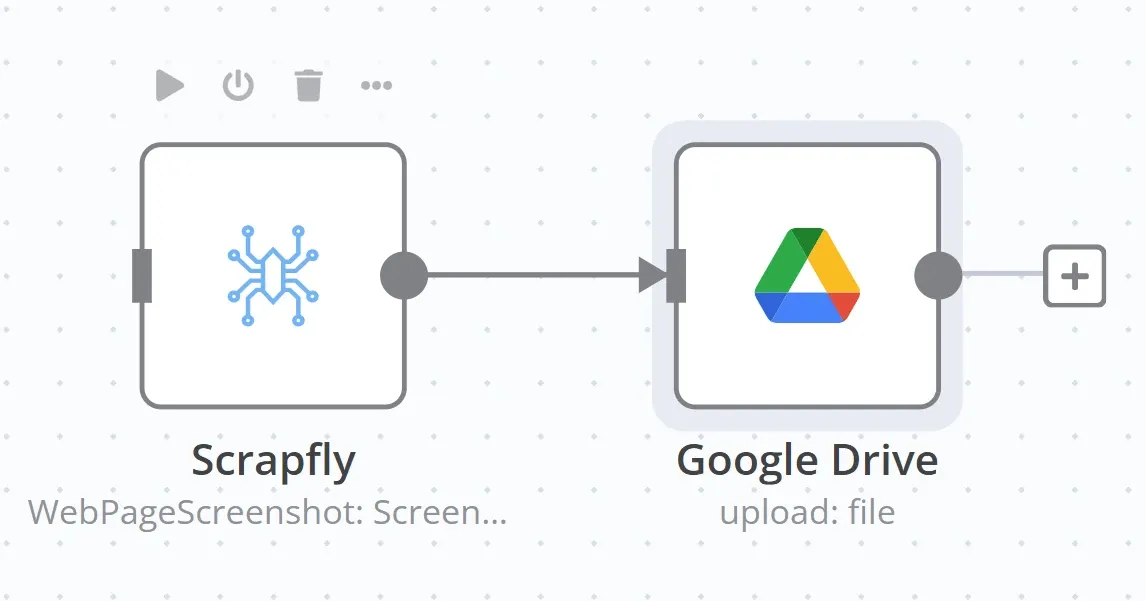
For a real life example, see this N8N template that captures screenshots and saves them to Google Drive:
For detailed instructions and example templates, refer to the Scrapfly n8n Integration Guide.
By leveraging these integrations, users can automate the process of capturing and managing website screenshots, enhancing efficiency and enabling more dynamic workflows across various platforms.
2. Python or Typescript SDK
While it's possible to capture screenshots using web scraping API Scrapfly also includes a dedicated screenshot API that significantly streamlines the screenshot scraping process.
The Screenshot API can be accessed through the SDK's screenshot() method and configured through the ScreenshotConfig configuration object. Here's a basic examples for Python and Typescript SDK:
Python SDK
Python SDK gives you a handy abstraction to interact with Scrapfly API. It includes all of scrapfly features and many convenient shortcuts.
The following example demonstrates how to capture a screenshot using Scrapfly's API.
from scrapfly import ScrapflyClient, ScreenshotConfig

client = ScrapflyClient(key="YOUR_SCRAPFLY_KEY")

api_result = client.screenshot(ScreenshotConfig(
    url="https://web-scraping.dev/product/1",
    # specify any viewport resolution
    resolution="1920x1080",
    # capture fullpage, viewport or specific area
    capture="fullpage",
    # capture=".review"
    # scroll to the bottom of the page if needed
    auto_scroll=True,
    # add options to apply dark mode or block banners
    options=[
        "block-banners",
        "dark-mode"
    ]
))
print(api_result.image)  # binary image
print(api_result.metadata)  # json metadata
Here, the screenshot() method is called with a ScreenshotConfig that specifies the URL. The API returns the binary image data and metadata in JSON format. This data can then be saved or further processed.
Typescript SDK
Typescript SDK is the easiest way to access Scrapfly API in Typescript, Javascript and NodeJS. It provides a client that streamlines the scraping process
The following example provides additional customization options. It shows how to configure the screenshot settings, and save the result to a file.
const client = new ScrapflyClient({ key: "YOUR_SCRAPFLY_KEY" });
const scrapeResult = await client.screenshot(
  new ScreenshotConfig({
    url: 'https://web-scraping.dev/product/1',
    // Specify the resolution of the screenshot
    resolution: '1920x1080',
    // Capture the full page or specify a specific area like "#reviews"
    capture: "fullpage",
    // Scroll to the bottom of the page before taking the screenshot
    auto_scroll: true,
    // Add options to apply dark mode or block banners
    options: [
      ScreenshotOptions.BLOCK_BANNERS,
      ScreenshotOptions.DARK_MODE,
    ]
  }),
);

fs.writeFileSync('screenshot.png', Buffer.from(scrapeResult.image));
In this code, the ScreenshotConfig object sets the target URL and other options like resolution and capture mode. The auto_scroll flag ensures the page scrolls fully before the capture. Finally, the binary image data is written to a file named screenshot.png.
1. API Call
Using Scrapfly's Screenshot API via a simple HTTP call is the easiest way to capture a webpage screenshot. With just a single curl command, you can generate a screenshot without needing any extra libraries or complex code.
curl -G \
--request "GET" \
--url "https://api.scrapfly.io/screenshot" \
--data-urlencode "key=YOUR_SCRAPFLY_KEY" \
--data-urlencode "capture=fullpage" \
--data-urlencode "url=https://web-scraping.dev/product/1" -o screenshot.jpg
Replace YOUR_SCRAPFLY_KEY with your actual API key. This command sends a request to the Scrapfly API with parameters for the target URL and desired capture mode. The screenshot is then saved directly as screenshot.png, making it a fast and simple solution for automated screenshot needs.
FAQ
What are the best tools for automating Chrome screenshots?
Playwright, Selenium, and Puppeteer are popular tools for automating Chrome screenshots. They offer full web browser automation APIs, allowing you to select areas to capture, wait for page loads, block pop-ups and ads, as well as click around to reach necessary pages. For cloud options, Screenshot API can do all that and bypass any automation blocking for you!
How can I capture a full-page screenshot in Chrome through terminal?
Use the google-chrome --headless --screenshot command in the terminal to capture a full-page screenshot in Chrome. You can specify the window size and URL to capture the screenshot.
How do I handle dynamically loading content when taking screenshots?
Implement explicit waits in your automation script to ensure all content is fully loaded before capturing the screenshot. This can be done by waiting for a specific browser signal like DOMContentLoaded, using explicit wait in seconds, or waiting for a specific element to appear using CSS selectors.
Summary
Automating Chrome screenshots can significantly improve efficiency in various tasks, from website monitoring to UI testing. Tools like Playwright, Selenium, and Puppeteer provide powerful APIs for automation. Direct browser commands and Chrome extensions offer simpler alternatives for basic screenshot needs. Remember to address common challenges like pop-ups and dynamically loading content to ensure accurate and complete screenshots.


